
Bill of materials and weight
The bill of materials answers the two questions a van conversion actually turns on: what will this build weigh, and what will it cost? Every object you place carries a weight and a cost, and VanCAD keeps a running total of both - so the layout you are drawing is also a shopping list and a payload calculation, kept up to date as you move things around.
Two things are worth knowing before you trust a number. Catalogue figures are estimates for a typical component of that kind, and you can replace any of them with the real figure from the product you are actually buying. And the weight total is what you are adding: the empty van’s kerb weight is set separately, in the van’s dimensions.
Where the totals live
Section titled “Where the totals live”At the foot of the Object List, under everything you have placed: Added weight (what you have put in the van), Laden (that plus the van’s own empty weight) and Est. cost. Wiring and plumbing runs are listed above them by system and specification, billed by their routed length, any openings you have cut are listed too, and an Inner shell row carries what lining the van out weighs. The van’s own cab seats are not counted - a van comes with them, so they are neither an added component nor added weight.
Hidden objects are not in the weight totals. Hide something - with its eye, or through a van state that hides it - and its weight comes off Added weight and Laden until you show it again, with a line under the total saying how much is out. It stays in the bill of materials and in the cost total: it is still something you are building and buying, it is just not in the van as you are looking at it.
References are not in the bill at all. An object marked Reference only (ghost) is kept for where it is, not as something you are building, so it leaves the bill of materials and both totals.
Raw materials are listed twice. A sheet or batten is billed here like any object, and listed again in the cut list above the wiring rows - by material, as the pieces to cut.
If an object’s specification cannot be resolved, a small warning under the totals says how many are in that state; those objects contribute to no line and no total rather than being silently counted as zero.
Inner shell
Section titled “Inner shell”What it is. A row under the bill, with an information button beside its heading, carrying what lining the van out weighs: the insulation, the battens behind it, the boards or cladding on the walls and ceiling, and the floor you walk on with its covering.
What it does. Puts that weight in Added weight, in Laden, and on both axles. It is there because you added it - a van does not come lined, so the shell is part of your conversion as much as the furniture standing in it, and leaving it out would make an empty design look weightless. Because it is spread over the living area, both axles carry some of it before you place a single component.
Where the figure comes from. Your own van’s lined area - its floor, walls, roof and ends - against a conventional build-up, so a long high-roof van starts heavier than a small one. Treat it as a starting point. What a shell really weighs depends on decisions you have not made yet: 5 mm ply against 12 mm tongue-and-groove, battens or none, a thin lino against a click floor. The gap between a light build and a heavy one on the same van is easily 80 kg.
How to change it. Shell mass, in Edit Van Dimensions under the Van menu. Set it to 0 if your van already came lined, since that weight is in its kerb weight already; the row then disappears from the bill.
What it does not have. A cost. What a shell costs depends on which materials you line with, and VanCAD has not asked.
Per-axle weight
Section titled “Per-axle weight”What it is. The Added weight row expands, with the chevron beside it, into a Front axle and a Rear axle figure: how much of what you have added each axle is carrying. The same row, with the same expand, is on the demo viewer’s Specs panel.
What it does. VanCAD takes every object at the centre of its box, works out where that centre sits between the van’s two axles, and splits the object’s weight between them the way a plank on two trestles splits a load - most of it on the nearer axle. A group is not one lump: each of its members is counted where it actually is. A wiring or plumbing run is spread along its routed length, and an opening is taken at the middle of its aperture. The two figures always add up to the weight counted, and they update as you move, resize, group and re-weigh things.
Options and limits. The figures are added weight only - what you have put in the van, not the van itself, and not a verdict on whether an axle is overloaded. What your own van can carry is yours to check: its plated axle limits are on the VIN plate, in the door frame or the engine bay, and in the handbook, and your build has to stay inside them once the van’s own weight, you, your water and your kit are all on board. VanCAD does not carry those limits: they are published for only some of the vans in the library, and a figure shown for some vans and missing for others would be more confusing than useful. Every figure is a plus: it is weight added to that axle. Weight behind the rear axle takes weight off the front, so an object on the rear overhang can put more than its own weight on the rear axle and show a minus on the front - and the same the other way round, for anything ahead of the front axle in the nose; a line under the figures says which whenever it happens, and it is the honest reading - a weighbridge would show the same. The split follows the van state you are viewing, since a posed member has moved along the van, and hidden objects leave the axles: hide something to see behind it and its weight comes off the split - and off the Added weight and Laden totals above it - until you show it again, with a line under the total saying how much is out. The centre-of-box model is a model: a fridge is heavier at the back and a water tank is only a box of water, so read the split as a planning figure, not a measurement.
Front axle
Section titled “Front axle”The added weight the front axle is carrying: every counted object’s share, taken at the centre of its box and split by where it sits between the axles. A minus here means weight behind the rear axle is lifting the front, and the line under the figures says so.
Rear axle
Section titled “Rear axle”The added weight the rear axle is carrying, on the same basis. It can be more than the total: weight behind the rear axle (on the overhang) puts more than its own weight on that axle, and the difference comes off the front. Both figures always add up to the Added weight above them.
The weight map
Section titled “The weight map”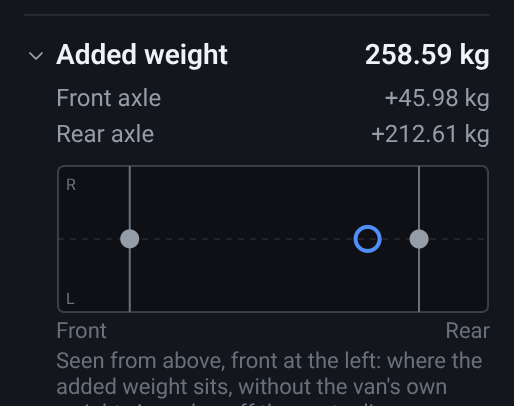
What it is. Under the two figures, a small picture of the van from above, front at the left,
shows where the added weight sits - the thing the two figures cannot tell you, because a van
balanced front-to-rear can still be loaded to one side. The two lines across it are the axles; the
grey marker on each is the centre of that axle’s added load, and the blue ring is the centre of
everything you have added (a ring, so the grey marker it usually sits on stays visible inside it). A marker on the dashed centre line means that load is even side to side.
A marker well off centre means that side of the van is carrying the load - batteries and water
tanks on one side are the usual cause - and the fix is to move something across. The R and L
in the nose say which edge is which side. Like the figures, the map is the added weight only:
the van’s own weight is not in it, and it assumes the empty van is even. A marker drawn hollow
belongs to an axle that is being lifted rather than loaded (the minus case above), and a marker
drawn dashed at the edge is one whose true position is off the map - a load on the rear overhang
can do that to the whole load’s ring, and a lifted axle’s centre can be anywhere.
What it affects. Nothing in your design. Select any object to see its own share in the Inspector - see Per-object figures.
What is in this section
Section titled “What is in this section”- Per-object figures - the weight, cost and source fields on an object, and how an override behaves.
- Currency - choosing the currency the cost total is shown in.
Related
Section titled “Related”- Guides: in-depth walkthroughs - a full build ends by reading its build sheet.
- Raw materials and cut lists - the pieces whose weight and cost are worked out from their size.