
The Van menu
Everything about the vehicle itself, as opposed to what you have put inside it, is in one dropdown on the toolbar.
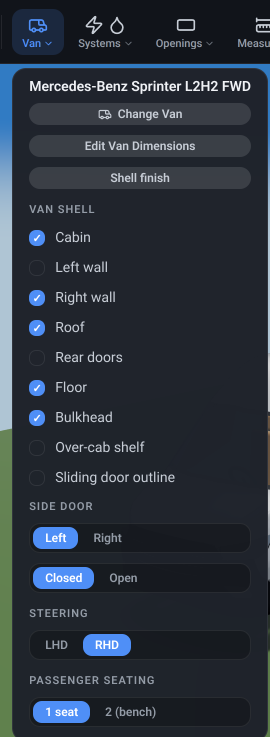
The Van menu
Section titled “The Van menu”What it is. A toolbar dropdown, headed by the name of the van you are designing in - the make, model and trim you chose in the van picker.
What it does. Collects the van-level settings: which van it is, which parts of its shell are drawn, how the cab is laid out, and what the shell is finished in.
It is in two halves. The first three controls open something else - Change Van goes to the van picker, Edit Van Dimensions and Shell finish each take over the right-hand panel. Everything below the Van shell heading is a setting you change here in the menu.
Options and limits. Almost everything here is part of your design - saved with it, and undoable. The one exception is the Sliding door outline toggle, which is a view aid and belongs to this browser rather than to the design. The demo explorer carries a shorter version of this menu: the shell checklist, the sliding door’s Closed / Open control and Shell finish, so you can look inside a demo van and restyle it. The settings that change what the van is - Change Van, the door’s side, the steering side, the cab seating and Edit Van Dimensions - are not offered there, because a demo is a finished design built around one of each. Nothing you change in the explorer is kept.
What it affects. The van, not your objects. Changing a setting here never moves or deletes anything you have placed - the one exception is the cab seats, which are re-created when you change the steering side or the passenger seating (see below).
Change Van
Section titled “Change Van”What it is. The first button in the menu.
What it does. Starts a new design on a different base van, by way of the van picker.
Options and limits. This is a new design, not a conversion of the current one: your current layout is replaced, and the undo history goes with it. A confirmation step says so first, and a subscriber can save the current design (naming it if it has never been saved) before continuing. On the free tier the current design is lost, so use it deliberately.
What it affects. Everything - it is a fresh start.
Edit Van Dimensions
Section titled “Edit Van Dimensions”What it is. The second button in the menu, under Change Van.
What it does. Opens the van’s measurements - width, height, length, wheelbase, base mass, shell mass and the over-cab shelf gap - in the right-hand panel, in place of the Inspector. Each is documented in Van dimensions.
Options and limits. The van’s model is not editable here: it names the van the design was started from, and changing it means starting a new design (Change Van, above).
What it affects. Covered on that page - in short, the shape of the shell and the base of your laden-weight total.
Shell finish
Section titled “Shell finish”What it is. The third button in the menu - and the first one in the demo explorer, which does not offer the two above it. It opens a panel that finishes the three parts of the van’s shell: its inner walls (the ply lining), its inner floor and its outer bodywork.
What it does. Sets the colour, and for the two inner parts the material texture, that each part of the van is drawn in - so you can preview a birch ply lining against a dark floor, or see the van in the colour you are actually buying.
Options and limits. The outer bodywork is colour only: there is no texture list for it, since a van’s outside is paint. The inner walls and the inner floor each carry the same colour and texture pickers as an object’s Appearance page. How glossy the outside looks is a separate setting, Paint, in the Visuals settings.
What it affects. Appearance only - no weight, no cost, no measurement. It is saved with your design and is undoable.
The Shell finish panel
Section titled “The Shell finish panel”What it is. The panel the button above opens, in the right-hand dock in place of the Inspector - not a dialog over the design.
What it does. Holds the three parts’ colour and texture pickers behind the switch below, and repaints the van live as you choose: the point of taking the dock rather than covering the viewport is that you are looking at the van while you decide. Done, in its header, hands the dock back to the Inspector.
Options and limits. Only one of the two van panels is open at a time - opening Edit Van Dimensions closes this one, and the other way round. Nothing here is a mode: the rest of the app carries on working while it is open, and you can select and edit objects with it up.
What it affects. Nothing on its own - what it holds is described in the two entries around it.
Which part to finish
Section titled “Which part to finish”What it is. A three-option switch at the top of the Shell finish panel - Inner walls, Inner floor, Outer bodywork - like the view filters in the Systems menu.
What it does. Shows one part’s colour and texture options at a time, so the panel names all three parts up front instead of stacking them down a scroll.
Options and limits. The parts are independent: switching between them changes nothing, and any finish you have set stays set. The switch itself is not part of your design and is not saved - the panel opens on the inner walls each time.
What it affects. Only what the panel is showing.
Show and hide shell parts
Section titled “Show and hide shell parts”What it is. A checklist of the van’s parts: Cabin, Left wall, Right wall, Roof, Rear doors, Floor, Bulkhead and the Over-cab shelf, plus a Sliding door outline toggle.
What it does. Draws or hides each part, so you can see and reach inside the van. A design opens with the left wall, the rear doors and the over-cab shelf hidden - that is the cutaway view you build in, looking into the van from its left-hand side.
Options and limits. The inner ply lining’s other faces are always drawn; only the parts listed have a toggle. Bulkhead hides its outer wall and its inner face together - and it is the one row the demo explorer leaves out, because hiding it opens the cab into the living space, which is a layout decision the demo’s author has already made. The Sliding door outline toggle is a drawing aid rather than a part: it shows the discreet outline of the closed sliding door on the wall, so you can see where the doorway will be without opening it.
What it affects. What is drawn, and what you can click through to. It changes no measurement, no weight and no cost. The choice is saved with your design, so a design reopens with the same parts hidden, and it is undoable.
Sliding side door
Section titled “Sliding side door”What it is. A Left / Right choice, present only for vans that have a factory sliding door that fits the living area. It sits above the Closed / Open control described next.
What it does. Puts the sliding door on that side of the van.
Options and limits. The doorway is the vehicle’s real aperture width for that model; it is not adjustable, and if a van has no sliding door this control is simply absent. The demo explorer does not offer it - a demo is a finished design with its furniture placed around one entryway - so you choose the side while designing your own van.
What it affects. The shell’s geometry, so it changes what your objects can be placed against and what a wall-mounted object trims to. It adds no weight and no cost.
Opening the sliding door
Section titled “Opening the sliding door”What it is. A Closed / Open choice, below the side control above.
What it does. Opening the door cuts the doorway out of that wall, so you can plan furniture around the real entryway rather than around a flat wall.
Options and limits. To see the doorway you need that side’s wall shown - if the door is on the side you have hidden for the cutaway view, either open the wall or move the door to the other side. Unlike the side control, this one is offered in the demo explorer too: sliding a door open is a way of looking into the van rather than a change to the design, which is also why it keeps working while a free session is paused.
What it affects. The shell’s geometry while the door is open, so a wall-mounted object beside the doorway trims to the aperture. It adds no weight and no cost.
Steering side
Section titled “Steering side”What it is. An LHD / RHD choice.
What it does. Puts the driving position on the left or the right, moving the cab controls and the driver’s seat to that side.
Options and limits. Changing it re-creates the cab seats in their standard positions, which discards any swivelling or moving you had done to them - an accepted consequence of changing the cab layout deliberately. Seats you have placed yourself from the catalogue are untouched.
What it affects. The cab. The cab seats are excluded from your weight and cost totals, because a van comes with them.
Passenger seating
Section titled “Passenger seating”What it is. A choice of 1 seat or 2 (bench) beside the driver.
What it does. Fits a single passenger seat or a two-person bench in the cab.
Options and limits. Like the steering side, changing it re-creates the cab seats and discards any manual posing of them.
What it affects. The cab, and what the cab looks like from the living area. Not your totals.
Related
Section titled “Related”- Van dimensions - the measurements behind the Edit Van Dimensions button.
- The Visuals settings - the paint finish and the scene around the van.
- Openings - cutting your own windows and vents into these shell parts.