
The Systems menu
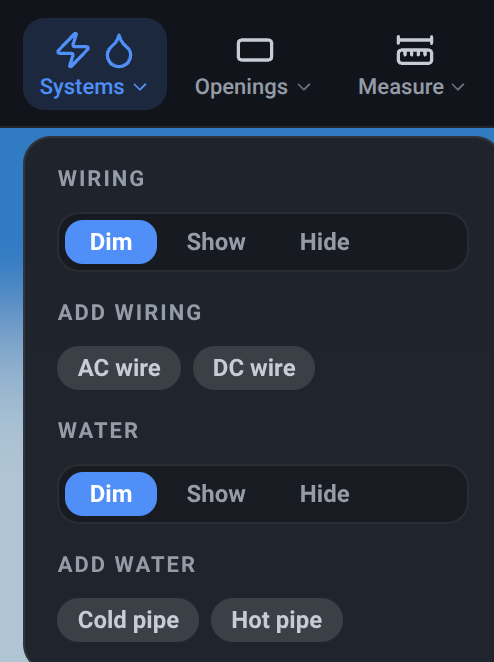
Everything that runs through the van - electrical cable and water pipe - is under one toolbar button, Systems. Each system has the same two things in it: a View filter for the runs that already exist, and below it the buttons that start a new one. Wiring covers electrical cable, Water covers pipe, and nothing else about them differs.
Systems
Section titled “Systems”What it is. A toolbar button, marked with a lightning bolt and a droplet, that opens both systems in one dropdown.
What it does. Holds the wiring View filter and its AC wire and DC wire buttons, then the water View filter and its Cold pipe and Hot pipe buttons.
Options and limits. The dropdown is inert during the interface tour, so a stray click cannot drop you into drawing mode mid-tutorial. On a narrower window there is no room for it on the bar and the whole menu moves into the More menu, view filters and Add-route buttons and all.
What it affects. Nothing on its own. See the controls below.
Wiring
Section titled “Wiring”What it is. On the demo explorer, where you are looking at somebody else’s design rather than building your own, the electrical system has its own toolbar button.
What it does. Holds the wiring View filter, and nothing else - you cannot add a run to a design that is not yours.
Options and limits. The filter is the same control as the one in the van editor’s Systems menu, and it does the same thing. On a narrow window it moves into that toolbar’s own overflow menu.
What it affects. Nothing on its own.
What it is. The demo explorer’s button for the water system, next to Wiring.
What it does. Holds the water View filter.
Options and limits. Identical to Wiring in every respect.
What it affects. Nothing on its own.
Route view
Section titled “Route view”What it is. A three-way switch, Dim / Show / Hide, at the head of each system’s block. Each system has its own, and they are independent.
What it does. Sets how that system’s finished runs are drawn:
- Dim (the default) - the runs are drawn translucent, so they are readable without cluttering the layout.
- Show - that system is drawn solid and over the top of everything, and the rest of the scene fades back, including the other system. It is a focus mode rather than a brightness setting: it is for following one run through the van.
- Hide - that system’s runs are not drawn at all.
Options and limits. A selected run is always drawn, whatever its system’s filter says - so a run you have just finished stays visible even if that system is set to Hide, and disappears when you deselect it. Hiding a system does not remove its runs from the Object List, from your bill of materials, or from the weight totals: it is a display setting only, and you can still select a hidden run by its row in the list.
This is a preference for this browser session, not part of the design. It is not saved, it does not travel to another device, and it is not on the undo stack. Runs have no visibility eye in the Object List for exactly this reason - this filter is where a run is shown or hidden.
What it affects. What is drawn in the 3D view. Nothing else.
Add AC cable
Section titled “Add AC cable”What it is. A button under Add wiring, labelled AC wire.
What it does. Closes the menu and enters drawing mode for a mains (AC) cable run, ready for you to click points around the van. See Drawing a run.
Options and limits. The run starts on the default cable, 2.5 mm², and AC’s standard colour, green. Both are changed afterwards in Run properties - you do not pick a gauge before drawing. Entering drawing mode clears your current selection, and it cancels an opening you were drawing: the two drawing modes are mutually exclusive.
What it affects. Nothing until you finish the run.
Add DC cable
Section titled “Add DC cable”What it is. The second button under Add wiring, labelled DC wire.
What it does. The same, for a battery (DC) cable run.
Options and limits. Also starts on 2.5 mm² cable - AC and DC share the electrical cable list - and on DC’s standard colour, purple.
What it affects. Nothing until you finish the run.
Add cold pipe
Section titled “Add cold pipe”What it is. A button under Add water.
What it does. Starts drawing a cold-water pipe run.
Options and limits. Starts on the default pipe, 15 mm, and cold’s standard colour, blue.
What it affects. Nothing until you finish the run.
Add hot pipe
Section titled “Add hot pipe”What it is. The second button under Add water.
What it does. Starts drawing a hot-water pipe run.
Options and limits. Also starts on 15 mm pipe, and on hot’s standard colour, red.
What it affects. Nothing until you finish the run.
Related
Section titled “Related”- Drawing a run - what happens once you have pressed one of the four Add buttons.
- Run properties - changing the system, type, cable or pipe spec, and colour after the run exists.
- The toolbar - where this button sits, and what moves where on a narrow window.