
Van dimensions
Edit Van Dimensions, in the Van menu, opens the vehicle’s own measurements in the right-hand panel. Because VanCAD builds its vans from parameters rather than from fixed models, changing one of these numbers re-generates the whole shell around it - the walls, the roof curve, the wheel arches and the cab all follow.
The panel names the van at the top. That name is read-only: it says which vehicle the design started from, and choosing a different one means starting a new design.
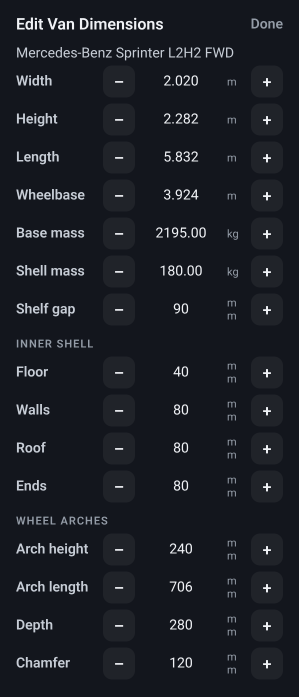
The Edit Van Dimensions panel
Section titled “The Edit Van Dimensions panel”What it is. The panel pictured above, in the right-hand dock in place of the Inspector - opened from Edit Van Dimensions in the Van menu.
What it does. Gathers every measurement the vehicle itself has, in three groups: the overall size and weight at the top, then Inner shell - how thick the build-out is on each surface - and then Wheel arches. The van re-generates live behind the panel as you step a value, which is why it takes the dock rather than covering the viewport.
Options and limits. Every row steps with its - and + buttons or accepts a typed figure, in whichever unit you are working in, and each has its own range described below. Only one of the two van panels is open at a time - opening Shell finish closes this one. Done, in the header, returns the dock to the Inspector.
What it affects. More than anything else in the app: these numbers are the shape everything else is fitted into, and the base of your laden-weight total. Each row below says what its own change moves.
What it is. The van’s overall exterior width, at its widest point.
What it does. Widens or narrows the whole body. The interior follows, so the usable width between the ply linings changes with it.
Options and limits. Steps in 50 mm, or type an exact figure in whichever unit you are working in. It accepts roughly 1.4 m to 3.2 m, and the range always includes the value your van started at.
What it affects. The shape everything else is measured against: what fits across the van, what an object trims to, and where wall-mounted things sit. It has no weight or cost of its own - see Base mass below.
Height
Section titled “Height”What it is. The van’s overall exterior height, roof included.
What it does. Raises or lowers the roof. Standing height inside is this less the floor build-up and the roof lining.
Options and limits. 50 mm steps; roughly 1.4 m to 3.6 m, always including your van’s own height.
What it affects. Headroom, and how much wall a tall unit has to sit against.
Length
Section titled “Length”What it is. The van’s overall exterior length, nose to rear doors.
What it does. Lengthens or shortens the body behind the cab - the cab itself is a fixed module for the vehicle, so the living area takes the change.
Options and limits. 50 mm steps, up to about 8 m. The lower limit is not a fixed number: the van must still hold its own cab plus a minimum living area, so a van with a long cab cannot be shortened as far as one with a short cab.
What it affects. The living area, and therefore almost every layout decision. It leaves the wheelbase alone: every library van starts with its real vehicle’s wheelbase stored, and any figure you type is kept, so the rear axle stays put as the body gets longer or shorter. Only a van with no wheelbase of its own follows the length. Shorten a van a long way and the rear wheels can end up behind the new rear wall - set the wheelbase yourself afterwards if that happens.
Wheelbase
Section titled “Wheelbase”What it is. The distance between the front and rear axles.
What it does. Moves the rear wheels along the van. The front axle belongs to the cab and stays where it is, so this is really “where are the rear arches?”.
Options and limits. 50 mm steps, from 1.5 m up to a limit derived from the van’s length - the rear wheel has to stay forward of the rear wall, so a shorter van allows a shorter maximum wheelbase.
What it affects. Where the rear wheel arches intrude into the living area, which is one of the real constraints on where a bed or a bench can go.
Base mass
Section titled “Base mass”What it is. The empty van’s weight - its kerb weight, before you add anything.
What it does. Sets the starting point of the Laden total: laden weight is this plus everything you have placed.
Options and limits. Steps in 50 kg, or type the exact figure. Each van in the library carries a researched approximate kerb weight, which is what this field starts at - treat it as a starting point, not as a specification. Weights vary with trim, drivetrain and options, and the figure on your own V5C or door-post plate is the one to trust. Enter that and every total downstream becomes yours rather than an estimate.
What it affects. The Laden total only. It is deliberately not part of Added weight, which is what your conversion adds.
Shell mass
Section titled “Shell mass”What it is. What lining the van out weighs: the insulation, the battens, the boards on the walls and ceiling, and the floor you walk on.
What it does. Adds that weight to your design from the start. VanCAD draws every design inside a lined shell, so the lining is already there before you place anything - and it is weight you added to the van, not weight the van came with. It therefore counts in Added weight, in Laden, and in the front and rear axle figures, which is why an empty design does not read as zero.
Options and limits. Steps in 5 kg, or type the exact figure. The starting number is worked out from your own van’s lined area - its floor, walls, roof and ends - against a conventional build-up: around 10 kg per square metre of floor (insulation, boards and a covering), 5.5 for the walls, 4.5 for the roof and 3 for the ends. That puts a mid-size long-wheelbase van somewhere near 175 kg and the smallest van in the library nearer 70 kg.
Treat it as a starting point, not a specification. What a shell weighs depends on decisions you have not made yet: 5 mm ply against 12 mm tongue-and-groove, battens or none, a thin lino against a click floor, sound deadening over everything or in patches. The spread between a light build and a heavy one on the same van is easily 80 kg. Weigh your own materials as they go in and put the real figure here.
Set it to 0 if your van already came lined - a former workshop van with a ply floor and lined walls has that weight in its kerb weight already, and counting it twice would flatter nothing.
What it affects. Added weight, Laden, and both axle figures. It has no cost of its own, because VanCAD has not asked you which materials you are lining with.
Shelf gap
Section titled “Shelf gap”What it is. The clearance left above the cab’s glazing before the over-cab storage shelf starts, in millimetres whichever unit system you are in - it is a fitting gap of a few centimetres, and reads more clearly that way.
What it does. Moves the over-cab shelf up or down. A bigger gap keeps more of the windscreen clear; a smaller one gives more storage volume above the cab.
Options and limits. Steps in 25 mm. The usable range comes from the van’s own shape - from zero up to where the shelf would meet the inner shell at the bulkhead - so a value that no longer fits is shown clamped to the gap the shelf is actually built at, and the steppers move from that number rather than from one that was quietly discarded. Turn the Over-cab shelf on in the Van menu’s shell checklist to see the result, since it starts hidden.
What it affects. The shelf’s position and the volume above the cab.
Inner shell
Section titled “Inner shell”The four rows under Inner shell are your build-out: how thick the lining is between the van’s bodywork and the space you actually live in. A van is drawn as two shells, the metal outside and the insulated lining inside, and these numbers are the gap between them. Set them to what you are actually building and the interior you design against becomes your interior rather than a generic one.
They all work the same way. Each is in millimetres whichever unit system you are working in, because a build-up is a few centimetres and reads more clearly that way. Each steps in 10 mm, or you can type the exact figure - a real stack is rarely round, so 25 mm of insulation behind 12 mm of ply is 37, and 37 is what to type. Each accepts 20 mm to 300 mm on a van at its stock size: 20 mm is below the thinnest sensible build, and 300 mm is past the thickest anyone converts to. Shrink a van a long way and the top of the range comes down with it, because the lining still has to leave an interior to live in.
Changing a gap re-draws the shell straight away and leaves what you have already placed where it is. That is deliberate - nothing you have positioned gets shuffled behind your back - but it does mean that thickening a wall after you have laid out a design can leave a unit standing slightly inside the new lining. Move it, or set the shell up before you lay the van out.
What it is. The floor build-up: the insulation and the boards you walk on, sitting on the van’s own metal floor. 40 mm by default, which is a realistic 25 mm of insulation under 12 mm of ply.
What it does. Raises or lowers the floor you design on. The van’s own load floor does not move - it is the vehicle’s, not yours - so this stacks on top of it.
Options and limits. 10 mm steps, 20 mm to 300 mm on a stock-size van (less on one you have shrunk a long way). It shares the van’s height with the Roof row, so a thick floor and a thick ceiling together are limited by what standing height is left.
What it affects. Standing height, which this comes straight off. It also changes how much of the rear wheel arch is left above the floor, since the arch belongs to the vehicle and stays put - a thick floor can swallow it, which is an ordinary conversion technique but worth seeing before you rely on the space.
What it is. The side lining - insulation plus panelling, between the bodywork and the living space. 80 mm by default.
What it does. Moves both side walls inward or outward together.
Options and limits. 10 mm steps, 20 mm to 300 mm on a stock-size van (less on one you have shrunk a long way). It comes off both sides, so every millimetre here costs two of interior width.
What it affects. The usable width, which is what decides whether a bed goes across the van or along it. It also sets how much you gain from Cut into inner shell on the fitting options. Low down near the sill, where the bodywork rolls under, the lining follows the body rather than poking out through it, so a thin wall setting shows the van’s real curve there instead of a squared-off box.
What it is. The ceiling build-up - insulation plus the boards - below the van’s own roof. 80 mm by default.
What it does. Lowers or raises the ceiling you design under.
Options and limits. 10 mm steps, 20 mm to 300 mm on a stock-size van (less on one you have shrunk a long way), sharing the van’s height with the Floor row.
What it affects. Standing height, together with the floor, and the headroom above anything tall. On a van with a curved roof the lining follows the curve, so the number is the build-up at the ceiling rather than a flat lid.
What it is. The lining at the bulkhead and at the rear doors. One setting covers both ends. 80 mm by default.
What it does. Moves the front and rear walls of the living area inward or outward together.
Options and limits. 10 mm steps, 20 mm to 300 mm on a stock-size van (less on one you have shrunk a long way), off both ends. Many builds line the ends differently from the sides, or barely at all behind the rear doors, which is why this is its own row rather than following the walls.
What it affects. The living length - the run you have for a bed along the van, or for a kitchen against the bulkhead.
Wheel arches
Section titled “Wheel arches”The four rows under Wheel arches size the housing that stands over each rear wheel. Every van has one, every conversion has to build round it, and they differ enormously between models - so rather than draw a generic bump, VanCAD draws a box you can set to the one in your van. Measure yours with a tape and type the numbers in.
The housing is drawn as a box with the top front and rear edges cut back at 45 degrees, which is what most factory arch covers look like. Set the chamfer to 0 and you get a plain square-topped box instead. Both arches are the same: one set of numbers does the pair.
Two things about where it is measured from. The height is above the van’s own metal floor, not above your floor build-up - so thickening the floor covers more of the arch rather than lifting it, which is exactly what happens in a real van and is why a thick floor is a common way of burying a troublesome arch. And the depth is measured inward from the bodywork, not from your wall lining, for the same reason.
The housing has to cover the wheel opening cut in the van’s side, so the bottom of the Arch height and Arch length ranges is set by your model rather than being the same everywhere: nudge either below what its van needs and you get the smallest housing that still covers the opening. Depth has a floor too, but it comes from the wheel rather than the opening - see its own section below - and Chamfer goes down to 0 on every van.
Arch height
Section titled “Arch height”What it is. How far the housing stands above the van’s own metal floor. 240 mm by default, which is in the 150 mm to 250 mm a real rear arch intrudes.
What it does. Raises or lowers the flat top of the box.
Options and limits. 10 mm steps, up to 600 mm. The bottom of the range is your model’s own arch, which the housing has to cover - between about 50 mm and 220 mm depending on how high that van’s load floor sits over its axle.
What it affects. What you can stand on the floor beside the wheel, and how much of the arch your floor build-up buries. A bed platform or a set of drawers usually sits above this height, so it is worth getting right before laying out the rear of the van.
Arch length
Section titled “Arch length”What it is. How long the housing is front to back, centred on the rear axle. 700 mm by default, at the short end of the real 700 mm to 900 mm.
What it does. Stretches or shortens the box along the van.
Options and limits. 50 mm steps, up to 1.5 m. The bottom of the range is the width of your model’s own wheel opening (roughly 400 mm to 730 mm), and the top comes down on a short-wheelbase van, because the housing has to stay inside the load space rather than run out through the rear doors. On a van whose load floor sits low over its axle the opening is wider than 700 mm, and there the row starts at that figure instead - the housing has to cover the arch, so it cannot be shorter than the hole the arch comes through.
What it affects. How much run you have along the wall for a unit at floor level, and where a side-facing bench or a kitchen can start.
What it is. How far the housing reaches into the van from the bodywork. 280 mm by default.
What it does. Moves the inboard face of both housings in or out together.
Options and limits. 10 mm steps, up to 600 mm. It cannot go narrower than the wheel plus a little clearance - about 215 mm to 255 mm depending on your model’s tyre - and the pair always leaves at least 300 mm to walk between.
What it affects. The clear width down the middle of the van at floor level, which is usually the tightest measurement in the whole conversion.
Chamfer
Section titled “Chamfer”What it is. The angled cut across the top front and rear edges of the housing. 120 mm by default, measured as the setback from the corner.
What it does. Takes a 45 degree wedge off each top corner. 0 leaves a square-topped box.
Options and limits. 10 mm steps. The top of this range depends on the Arch height and Arch length you have set, because the cut can be no deeper than the box it is taken out of and has to stop before it reaches the wheel opening underneath - so shortening the box can bring the chamfer down with it. At the default sizes it accepts between 215 mm and 240 mm depending on your model.
What it affects. How much usable flat top the housing has, and how a unit built against it sits. A square box is easier to build a bench onto; a chamfered one is what most vans actually have.
What it is. The button that closes this panel. The same button closes the Shell finish panel.
What it does. Returns the right-hand dock to the Inspector.
Options and limits. Nothing is committed or discarded by it - every change you made took effect as you made it, and each is separately undoable.
What it affects. Which panel is showing.
A note on resizing a real van
Section titled “A note on resizing a real van”Changing these numbers gives you a van the shape you asked for, not a different model: the design keeps the model name it started from, and only its measurements move. That is what makes it useful for a vehicle whose exact figures you have measured yourself, or an unusual conversion - but if you are just after a different van, Change Van and pick it from the library, where every model comes with its own traced shape.
If you have already cut openings into the shell, resizing the van can leave one that no longer fits its surface. Those are flagged with a warning on their row in the Object List rather than silently dropped.
Related
Section titled “Related”- The Van menu - where this panel is opened from.
- Bill of materials and weight - where the base mass ends up.