
Appearance
The Appearance page decides what an object looks like: a colour, or a material texture wrapped over it. It is the one part of the Inspector that changes nothing measurable - a birch worktop and a steel one weigh and cost the same here, because the figures come from the component, not from its finish.
Appearance is per object, so a group has no Appearance page: select a member to finish it. It is also shared across a group’s states - re-colouring a bench in one state re-colours it in all of them.
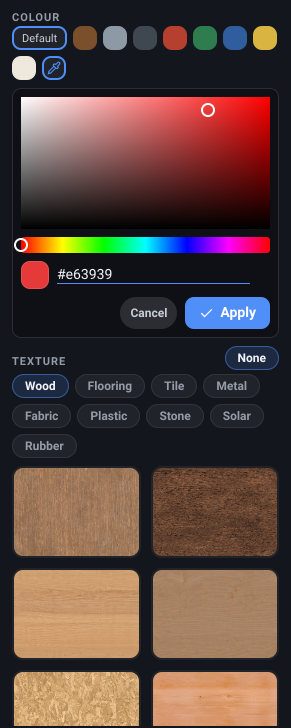
Default colour
Section titled “Default colour”What it is. The first chip in the colour row, labelled Default.
What it does. Clears any colour you have set, returning the object to its standard finish - the plywood tone most components are drawn in.
Options and limits. This is the only way back to the standard finish: there is deliberately no swatch of that colour in the row, so “no colour set” and “this exact colour set” can never be confused. It is highlighted whenever no colour override is in force.
Clearing the colour does not clear a texture. If the object is wearing one, the texture still covers it - see No texture below.
What it affects. The object’s colour. Nothing about its weight, cost or size.
Colour
Section titled “Colour”What it is. The row of eight preset swatches: walnut, steel grey, charcoal, rust red, forest green, blue, brass and off-white.
What it does. Paints the object that colour. The current one carries a ring.
Options and limits. These are common conversion tones, offered as the quick path; anything else comes from the custom picker beside them. A colour is part of your design, so it is saved with it and is on the undo stack.
What it affects. The object’s colour, unless a texture is applied - a texture always wins over the colour beneath it.
Custom colour
Section titled “Custom colour”What it is. The picker button at the end of the swatch row.
What it does. Opens an inline picker below the row - a saturation and brightness square, a hue slider, and an editable hex box - so you can match a specific paint or fabric.
Options and limits. The picker is a two-step control: dragging in it previews a colour, and it is applied when you press Apply. Cancel leaves the object as it was. If you pick a preset swatch while the picker is open, the picker re-seeds from that colour rather than quietly reverting it.
What it affects. The object’s colour, exactly as a preset swatch does.
No texture
Section titled “No texture”What it is. The None chip, at the right of the Texture heading.
What it does. Removes the texture, so the object goes back to showing its colour.
Options and limits. It is always reachable, whichever texture category you are browsing, and it is the only way to undo a texture from the picker - there is no unselect-by-clicking-again.
What it affects. Whether the object shows its colour or a material.
Texture category
Section titled “Texture category”What it is. The row of chips naming material families - wood, metal, fabric and so on.
What it does. Filters the grid below to one family, so the list stays browsable.
Options and limits. Only families that actually have textures in this build appear, and the tabs open on the family of whatever texture the object is already wearing, so the applied swatch is visible when you get there. Selecting a category changes nothing in the design - it is a filter.
What it affects. Which textures the grid shows.
Texture
Section titled “Texture”What it is. The grid of material images beneath the category chips, two per row, scrolling within a fixed band.
What it does. Wraps the object in that material. The applied one carries a ring.
Options and limits. A texture overrides the colour - the colour is still stored underneath and comes back if you clear the texture with None. The grid shows only textures this build actually ships, so a swatch can never look applied while rendering as flat colour, and the ground materials used for the scene around the van are never offered as an object finish.
What it affects. How the object is drawn. Its weight, cost, dimensions and snapping are unchanged; a texture is a finish, not a material specification, so nothing about it reaches your bill of materials.
Related
Section titled “Related”- The Inspector - the panel this page belongs to.
- The Visuals settings - the van’s own paint finish, which is set there rather than here.
- The custom-object editor - where each piece of an object you build gets its own colour and texture.