
Shaping a piece
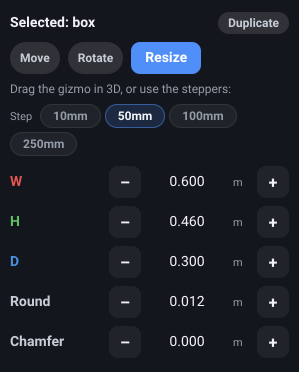
Click a piece in the scene, or its row in the build list, and the top of the right-hand panel becomes its controls: a Selected: line saying what you picked, a Duplicate button, the Move / Rotate / Resize tabs, and the rows for whichever tab is showing. It is the same shape as the van editor’s Inspector, and the handles in the 3D view work the same way.
Two differences are worth knowing:
- Handles only appear on a single selection. Select two or more pieces and the scene shows outlines instead, and the panel swaps to the move-together rows described at the foot of this page.
- What you can do depends on what you picked. A solid gets all three tools; a group and a reference ghost get Move and Rotate only. A group has no dimensions of its own to resize, and a ghost is a fixed snapshot of something you are lining up against.
A piece inside a group can be reached by expanding the group in the build list and selecting the member - the group opens up in the scene and the member becomes editable on its own. A nested group (a group inside a group) cannot be moved as one; the panel says so and suggests either editing a member or ungrouping the outer group.
Below the transform rows, a basic solid also carries the colour and texture controls - the same appearance controls as the van editor, applied per piece, so one fused object can mix materials. A group does not carry them: expand it and set the finish on a member, or select several pieces at once and set one finish across all of them.
What it is. The first of the three tabs.
What it does. Shows three coloured arrows through the piece in the 3D view and the X/Y/Z position rows in the panel. Dragging an arrow slides the piece along that axis.
Options and limits. There is no drop-onto-a-surface behaviour here and no snapping - the editor is a workbench, not the van, so pieces pass freely through one another. That is the point: overlapping is how Subtract and Intersect do anything.
What it affects. The piece’s position.
Rotate
Section titled “Rotate”What it is. The middle tab.
What it does. Shows three coloured rings and the X/Y/Z angle rows. Dragging a ring turns the piece.
Options and limits. A drag snaps to the current rotate step; hold Shift while dragging for a free angle. There is also a keyboard shortcut: Space turns the selected piece 90 degrees about the vertical axis.
What it affects. The piece’s rotation.
Resize
Section titled “Resize”What it is. The third tab. It is absent unless a single solid is selected.
What it does. Shows the face handles in the 3D view and the width, height and depth rows in the panel.
Options and limits. Every shape resizes on all three axes independently, so the round shapes stretch as freely as the box does. A group has no Resize tab: size its members instead, or ungroup it.
What it affects. The piece’s dimensions, and therefore the shape of the fused result.
Step size
Section titled “Step size”What it is. The row of chips labelled Step at the top of each tab.
What it does. Sets how far one press of - or + moves the value.
Options and limits. Move and Resize offer 10, 50, 100 and 250 mm in metric and 0.5, 2, 4 and 10 inches in imperial; Rotate offers 5, 15, 45 and 90 degrees whichever you are in. Each tab keeps its own setting. The rotate step is also the angle a drag on a ring snaps to.
These are the same step settings as the van editor’s Inspector, so a step you choose in here is the step you find when you go back to your van.
What it affects. Nothing on its own.
Position
Section titled “Position”What it is. The three rows - X, Y, Z - on the Move tab, colour-matched to the arrows.
What it does. Shows where the piece is and lets you place it exactly. Type a figure to set it, or
press - / + to nudge by the step size.
Options and limits. Values are read and typed in metres or feet, whichever you are using, and are stored to the nearest millimetre. The origin is the object’s own, marked by the small axis cross in the middle of the scene, not anything to do with the van.
With a group selected the same three rows move the whole group, and the figures are its bounding box’s centre.
What it affects. Position only.
Rotation
Section titled “Rotation”What it is. The three rows on the Rotate tab, in degrees.
What it does. Typing an angle sets the piece’s rotation about that axis outright; the - / +
buttons apply a turn relative to where it already is, so pressing + repeatedly keeps turning the
same way instead of folding back on itself.
Options and limits. The readout is rounded to whole degrees.
What it affects. Rotation only.
What it is. The W, H and D rows on the Resize tab.
What it does. Sets the piece’s bounding dimensions exactly - type a figure, or step it.
Options and limits. The floor is 1 mm on each axis. The rows are the piece’s own width, height and depth, so a piece you have turned still grows along its own W when you change W.
Shrinking a piece can shrink an edge round or chamfer with it: both are capped at half the shortest side, so they follow the box down.
What it affects. The piece’s dimensions.
What it is. A Round row under the size rows, in the same units.
What it does. Rounds the piece’s edges to that radius - the box’s twelve edges, or the rim of a cylinder, cone or dome.
Options and limits. It is only offered on the four shapes whose edges are known: box, cylinder, cone and dome. Sphere and torus have no edges to round, and wedge and pyramid are not supported.
The value is clamped to half the shortest side, which is the largest round that still leaves a shape, and 0 is sharp - so setting it back to zero undoes the rounding. Round and Chamfer cannot both be on: setting one clears the other.
What it affects. The shape of that piece, and therefore of the fused object.
Chamfer
Section titled “Chamfer”What it is. The row below Round.
What it does. Cuts the same edges off flat instead of rounding them - one angled facet where the round would have been, set back by the amount you give.
Options and limits. Identical to Round in every respect - same four shapes, same clamp at half the shortest side, 0 for a sharp edge - and the two are mutually exclusive, so setting a chamfer zeroes any round you had.
What it affects. The shape of that piece.
Duplicate
Section titled “Duplicate”What it is. The small button beside the Selected heading.
What it does. Makes a copy of the selected solid, group or ghost, and selects the copy.
Options and limits. The copy lands in exactly the same place as the original, so it looks as though nothing happened until you move it - which is what the ready-selected copy and the position rows are for. It keeps the original’s combine mode. A copy of a piece that lives inside a group is added to that same group.
Ctrl+C then Ctrl+V does the same thing. The editor’s clipboard is its own: you cannot copy a piece in here and paste it into your van, or the other way round.
What it affects. Adds one piece or ghost. Undoable.
Move together
Section titled “Move together”What it is. The X, Y and Z rows shown when two or more things are selected, under Move
together. They have - and + buttons and no readout.
What it does. Nudges everything in the selection by the step size at once, in a single undo step, without grouping it. There is no readout because a loose selection has no one position to show.
Options and limits. It moves solids, groups and reference ghosts alike - whatever is selected. Use it to shuffle a half-built assembly clear of something without committing to a group; use Group if you want the pieces to stay together from then on.
When the selection contains at least one basic solid, an Appearance (all selected) block appears below these rows and sets one colour or texture across all of them at once.
What it affects. The position of everything selected.
Related
Section titled “Related”- The build list - selecting, combining, grouping and reordering pieces.
- Appearance - the colour and texture controls, shared with the van editor.
- Move, rotate and resize - the same tools on a placed object.