
Move, rotate and resize
The Inspector’s Transform page has three tools, and the buttons at the top of it choose between them. The choice does two things at once: it changes the rows below, and it changes the handles drawn around the object in the 3D view. A freshly placed component starts in Move.
Throughout, the three axes are the van’s own, colour-matched to the handles: X (red) runs across the van, Y (green) runs up, and Z (blue) runs along it from the cab to the rear doors.
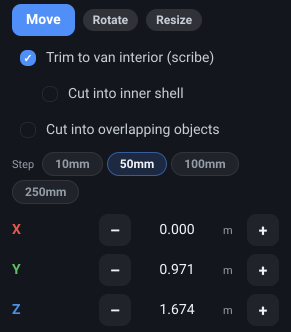
What it is. The Move tool: three coloured arrows through the object in the 3D view, plus a small sphere where they meet.
What it does. Dragging an arrow slides the object along that axis only. Dragging the centre sphere does something different and often quicker: it drops the object flat onto whatever is under the cursor - another object’s top, the van’s inner floor, or the ground outside - resting its underside on that surface, centred where you point. Rotation is untouched by a drop.
Options and limits. The drop only rests on surfaces that face upwards, so you cannot balance a cupboard on a wall; if the cursor points at nothing rest-able (the sky, say) the object simply holds still until you move back over something. It never rests on a cable or pipe run, on the van’s cab seats, or on the van’s own bodywork - the floor and the outside ground are the two van surfaces it recognises.
Snapping applies to a drop as well, sideways: with either snap switched on, an object dropped near a wall or beside another object lands flush against it rather than a few millimetres off. Only the sideways position is snapped - the height is what the drop itself decides, so resting something on a worktop never pulls it back down to the floor.
A group has the same centre sphere, and it behaves the same way: the whole group is placed with its underside on the surface under the cursor and its bounding box centred where you point. It never rests on its own members.
Handles are held at a constant size on screen, so they stay usable when you zoom out and never grow so large that they block the objects behind them. Turn on the full-length guide lines in the Settings menu, under Editing, if you want to see what a drag is lining up with.
What it affects. Position only. A drag is one undo step, however far you moved.
Rotate
Section titled “Rotate”What it is. The Rotate tool: three coloured rings around the object, one per axis.
What it does. Dragging a ring turns the object about that axis, in whole steps of the current rotate step - 5 degrees at a time to start with - rather than by whatever angle you happen to stop on. Hold Shift while dragging if you want a free angle.
Options and limits. The snap uses the step size set on this page - change the step to 90 and a drag turns in quarter turns. On the web there is also a shortcut for the common case: pressing Space with an object selected turns it 90 degrees about the vertical axis, which is almost always what you want when a unit is facing the wrong wall.
The snap applies to the turn, not to the angle you end up at, so it keeps a square object square rather than squaring up one that is not. An object already sitting at an odd angle - from a design you drew before the snap existed, say - stays that many degrees off as you drag it, and Space turns it a relative 90 degrees for the same reason. To put it back on square, type the angle you want into the X, Y or Z row below, or use Reset to take the object back to no rotation at all.
What it affects. Rotation only. The object keeps its position and dimensions.
Resize
Section titled “Resize”What it is. The Resize tool: six arrows, one per face, along the object’s own axes rather than the van’s.
What it does. Dragging a face grows or shrinks that dimension while the opposite face stays put - so pulling the front of a worktop forward extends it forward, rather than growing it symmetrically about its middle.
Options and limits. Components are parametric: resizing changes the shape that gets generated, it does not stretch a mesh. A longer worktop stays a worktop with the same edge profile. The one documented exception is a fused custom object, which scales as a single rigid body.
There is a floor of 1 mm and no upper limit. With a group selected the Resize page shows a scale control instead of dimensions - a group has no dimensions of its own - covered in Grouping and van states.
What it affects. The object’s dimensions, and therefore its footprint in the van. Weight and cost do not rescale with it: they stay whatever the component’s figures say, unless you override them yourself on the BoM page.
Step size
Section titled “Step size”What it is. The row of step chips at the top of each tool’s page.
What it does. Sets how far one press of a - or + button moves the value.
Options and limits. Move and Resize offer four sizes in whichever system you are working in - 10, 50, 100 and 250 mm in metric, 0.5, 2, 4 and 10 inches in imperial - and Rotate offers 5, 15, 45 and 90 degrees in both, angles being degrees either way. Each tool remembers its own step. Switching between metric and imperial keeps the chip you had chosen, so a step you had set third from the left is still third from the left afterwards.
The rotate step does double duty: it is also the angle a drag on a rotate ring snaps to.
What it affects. Nothing on its own. It only changes what the next - / + press does.
Position
Section titled “Position”What it is. Three rows - X, Y and Z - on the Move page.
What it does. Shows where the object is, and lets you place it exactly. Type a figure to set the
position outright, or press - / + to nudge it by the step size.
Options and limits. Typed values are in whatever units you are reading, metres or feet, and are stored to the nearest millimetre. Figures update live while you drag a handle, so the panel and the scene never disagree.
For an object inside a group, the figures are measured from the group rather than from the van - so moving the group as a whole leaves its members’ numbers unchanged.
What it affects. Position only.
Rotation
Section titled “Rotation”What it is. Three rows - X, Y and Z - on the Rotate page, in degrees.
What it does. Typing an angle sets the object’s rotation about that axis outright. The - / +
buttons instead apply a turn relative to where the object already is, so pressing + repeatedly
keeps turning in the same direction rather than folding back on itself past the vertical.
Options and limits. The readout is rounded to whole degrees.
What it affects. Rotation only.
What it is. The rows on the Resize page.
What it does. Sets the object’s dimensions exactly - type a figure, or step it by the step size.
Options and limits. These rows are labelled with the component’s own dimensions - Width, Height and Depth - not X, Y and Z, because they belong to the object rather than to the van. That distinction matters once something is rotated: a bench turned to face the side wall still grows along its own width when you change Width, whichever way it is pointing. The minimum is 1 mm and there is no maximum, so nothing stops you making an object bigger than the van; the van’s inner surfaces are a snapping aid, not a constraint.
What it affects. The object’s dimensions. See the note under Resize above about weight and cost.
Reset rotation
Section titled “Reset rotation”What it is. A Reset button at the foot of the Rotate page.
What it does. Returns the object to square, clearing rotation about all three axes at once.
Options and limits. Position and size are untouched - it only straightens the object up. It is undoable like anything else.
What it affects. Rotation only.
Reset size
Section titled “Reset size”What it is. A Reset button at the foot of the Resize page.
What it does. Returns the object to the dimensions it had when you placed it - the catalogue component’s own defaults, or for a custom object, the size it was built at.
Options and limits. It resets all three dimensions together; there is no per-axis reset. It does not touch position or rotation.
What it affects. The object’s dimensions.
Related
Section titled “Related”- The Inspector - the panel these pages live in.
- Snapping - making a drag land flush instead of approximately.
- The Visuals settings - the guide lines drawn while you drag.
- Tutorial: Place your first component, in the app under Tutorials.