
The Visuals settings
These are the settings for how the design is shown and worked on rather than for what it is: the turntable, the world around the van, the paint on it, the guides drawn while you drag, and what a click in the 3D view selects. They are three sections - Camera, Scene and Editing - at the foot of the van editor’s Settings menu, and the whole of the demo explorer’s Visuals menu.
Nothing in this menu is part of your design. Every setting here is a view preference held for this browser session, so it is not saved with the design, does not travel to another device, and does not appear in your bill of materials. That is also why none of it lands on the undo stack.
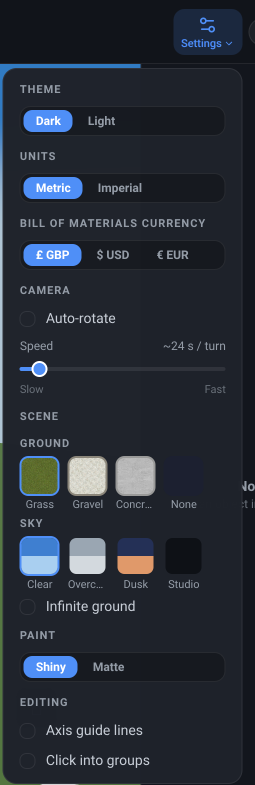
Visuals
Section titled “Visuals”What it is. On the demo explorer, where you are looking at a design rather than building one, these settings have their own toolbar button marked Visuals.
What it does. Opens the Camera and Scene sections in a dropdown of their own. In the van editor the same sections are the lower half of the Settings menu instead, with Editing below them.
Options and limits. On a narrow window there is no room for the button on the bar and the sections move into that toolbar’s overflow menu instead, with the same controls in the same order.
What it affects. Nothing in the design. See each control below.
Auto-rotate
Section titled “Auto-rotate”What it is. A checkbox at the head of the Camera section.
What it does. Slowly turns the camera around the van on its own, for a turntable view of the finished layout.
Options and limits. Grabbing the view stops it - dragging to orbit, or moving the camera any other way, takes control back rather than fighting the rotation. Turn it on again from the menu.
What it affects. The camera only.
Auto-rotate speed
Section titled “Auto-rotate speed”What it is. A slider beneath the Auto-rotate checkbox.
What it does. Sets how fast the turntable spins.
Options and limits. It reads out as seconds per full turn rather than an abstract number, so you can match it to whatever you are recording or presenting. The setting is kept whether or not auto-rotate is currently on.
What it affects. The camera only.
Ground
Section titled “Ground”What it is. The ground picker in the Scene section.
What it does. Sets the surface the van is standing on.
Options and limits. Four choices: Grass (the default), Gravel, Concrete, and None. None leaves the van floating against the sky, which is the cleanest backdrop for a screenshot of the layout itself.
What it affects. The scene around the van. It is not part of the design.
What it is. The sky picker, beside the ground picker.
What it does. Sets the sky and the light falling on the van, since the two go together - the backdrop and the lighting are one choice.
Options and limits. Four choices: Clear (the default), Overcast, Dusk, and Studio. Studio is a dark, even, product-photography backdrop rather than an outdoor sky.
What it affects. The scene around the van, and how its paint reads under the light. Not part of the design.
Infinite ground
Section titled “Infinite ground”What it is. A checkbox under the ground and sky pickers.
What it does. Extends the ground out to the horizon instead of the small pad the van sits on by default.
Options and limits. It is disabled when the ground is set to None - there is no surface to extend.
What it affects. The scene around the van. Not part of the design.
What it is. A two-way switch in the Scene section: Shiny or Matte.
What it does. Switches the van’s outer bodywork between a glossy clear-coat and a flat matte wrap.
Options and limits. Shiny is the default. Matte is also the lighter of the two to draw, so it is worth trying if the 3D view feels sluggish on your machine.
What it affects. How the bodywork is drawn. It does not change the van’s colour - that is Shell finish in the Van menu - and it is not part of the design.
Axis guide lines
Section titled “Axis guide lines”What it is. A checkbox in the Editing section.
What it does. Draws full-length guide lines through an object along the axis you are dragging it on, so you can see what it lines up with elsewhere in the van.
Options and limits. It is a single preference for the whole app rather than a per-object setting, and the guides appear only while you are actually dragging with the move handles.
What it affects. What is drawn while you drag. It does not move anything on its own - for that, see Snapping.
Click into groups
Section titled “Click into groups”What it is. A checkbox in the Editing section. It is off unless you turn it on.
What it does. Lets a click in the 3D view reach inside a group. With a group selected, clicking one of its parts steps the selection one level down towards that part - the group, then a sub-group, then the part itself - and clicking on past the part cycles back out to the whole group.
Options and limits. With it off, which is how VanCAD starts, a click in the 3D view always selects the whole group, however many times you click. That is deliberate: stepping inside is easy to trigger without meaning to, and once you are inside, dragging moves one part of the group rather than the group. The way to a single part with this off - and the clearer way with it on - is the Object List: expand the group and click the part’s own row, which always selects exactly that row.
Holding Shift suppresses the step whether or not this is on, and adds the whole group to a multi-selection instead.
What it affects. What a click in the 3D view selects. It changes nothing about the design, and like everything else in this menu it is not saved with it.
Related
Section titled “Related”- The 3D view - orbit and fly, projection, and the navigation cube.
- Guides: in-depth walkthroughs.